
BTH93 Tribit Flybuds C1 True Wireless Earbuds User Manual
Learn more about the EU Declaration of Conformity, Please click below link to download.http://files.tribitaudio.com/bth93-uk-doc.pdf
Package Contents

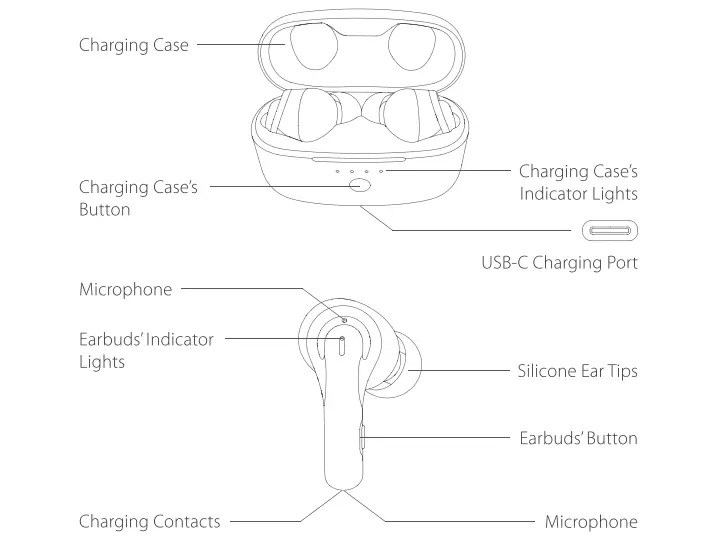
Product Parts
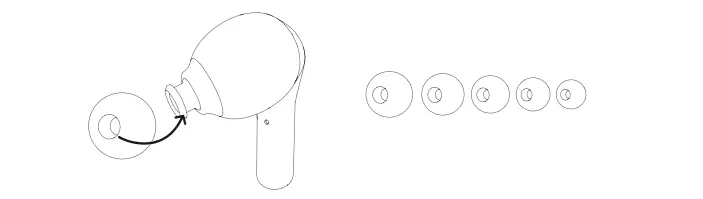
How to Replace the Ear Tips
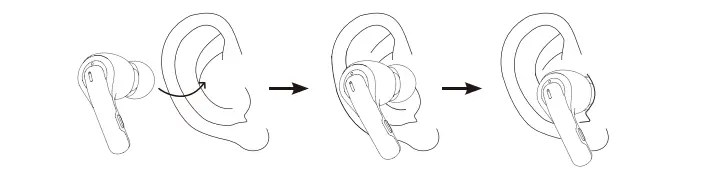
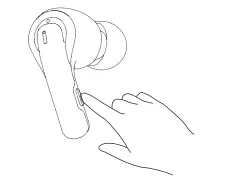
How to Wear the Earbuds
Power ON / Power OFF
The first time you use the earbuds, put them into the charging case, then close the charging case.
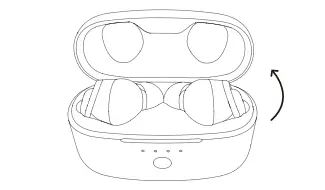
To power On: Open the charging case
To power Off: Close the charging case
Bluetooth Connection Instructions
- Connect the earbuds to a Bluetooth device
Open the upper cover of the charging case and the earbuds will automatically enter the Bluetooth pairing mode, then the earbuds’ indicator lights will flash alternately red and white. Turn on the Bluetooth function in the Bluetooth device, refresh the Bluetooth device listing, then select the paired audio device named “Tribit FlyBuds C1” to connect. The indicator lights of the earbuds will go off after it connects successfully.
- Connect the earbuds with other devices as follows
- First disconnect the currently connected Bluetooth device, then the earbuds will automatically enter the Bluetooth pairing mode.
- Put the left and right earbuds back into the charging case and keep the charging case open. Press and hold the button on the charging case for 5 seconds. After the 4 indicator lights of the charging case flash 3 times simultaneously, the earbuds will automatically enter Bluetooth pairing mode.
Previous Track:Double-click the button of the left earbud
Rejecting an Incoming Call:Double-click the buttons on the left/right earbuds
Increase theVolume:Press and hold the button of the right earbud (when music is playing)
Power Off:Press and hold any button of the earbuds for 6s (when music is not playing)
Play/Pause Music:Click the buttons on the left/ right earbuds
Answer/End a Call:Click the buttons on the left/ right earbuds
Next Track:Double-click the button of the right earbud
Activate theVoice Assistant:Triple-click the buttons on the left/right earbuds
Decrease the Volume:Press and hold the button of the left earbud (when music is playing)
Power On:Press and hold any button of the earbuds for 2s (when music is not playing)
Earbuds Indicator Lights Key
Charging State: The white light will stay on
Bluetooth Device Pairing: The red and white lights flash slowly
Successful Connection: The indicator lights are off
Low Battery: The red light flashes slowly
Patterns of Charging Case’s Indicator Lights
Open the top cover of the charging case or short press the button of the charging case quickly to display the battery level of the charging case
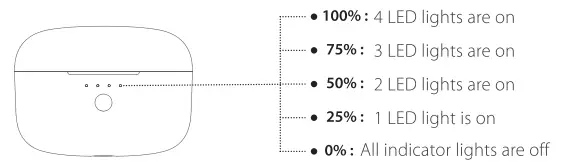
- Earbuds’ charging status indication
The left-most and right-most indicator lights of the charging case respectively show the charging status of the left and right earbuds.The indicator lights are always on during the charging process and go off when the earbuds are fully charged.
Charging Info
- To charge the earbuds: Put the earbuds into the charging case to start charging.Charging time of the earbuds: about 90 minutes
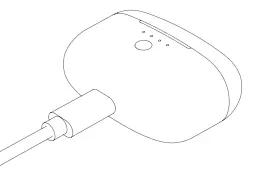
- To charge the charging case: Plug one end of the USB cable into a 5V power supply, and the other end into the charging port of the charging case for charging. The indicator lights will flash during the charging process, and the 4 indicator lights will stay on when the earbuds are fully charged.Charging time of the charging case: about 120 minutes
How to Reset the Earbuds
Put the left and right earbuds back into the charging case. Then press and hold the button of the charging case for 10 seconds, and the indicator lights of the charging case will flash 2 times in a marquee pattern from left to right. Next, clear the pairing connection records of the left and right earbuds and clear the connection records of the mobile phone. After the earbuds are reset successfully, the white lights of the left and right earbuds will flash quickly, and the left and right earbuds will automatically pair and connect after a few seconds.
Note: After resetting, if there is a Bluetooth device that has been connected to the earbuds, you need to delete the pairing record to allow the earbuds to be discoverable for pairing again.
FCC Statement
Changes or modifications not expressly approved by the party responsible for compliance could void the user’s authority to operate the equipment.
This equipment has been tested and found to comply with the limits for a Class B digital device, pursuant to Part 15 of the FCC Rules.These limits are designed to provide reasonable protection against harmful interference in a residential installation.This equipment generates uses and can radiate radio frequency energy. If not installed and used in accordance with the instructions, it may cause harmful interference to radio communication. However, there is no guarantee that interference won’t occur in a particular installation. If this equipment does cause harmful interference to radio or television reception, which can be determined by turning the equipment off and on. Users are encouraged to try to correct the interference by one or more of the following measures:
- Reorient or relocate the receiving antenna.
- Increase the separation between the equipment and receiver.
- Connect the equipment into an outlet on a circuit that is different from that to which the receiver is connected.
- Consult the dealer or an experienced radio/TV technician for help.
This device complies with part 15 of the FCC rules. Operation is subject to the following two conditions:
- This device may not cause harmful interference.
- This device must accept any interference received, including interference that may cause undesired operation.
Qualcomm aptX is a product ofQualcomm Technologies, Inc. and/or its subsidiaries.
Qualcomm is a trademark of Qualcomm Incorporated, registered in the United States and other countries. aptX is a trademark of Qualcomm Technologies International, Ltd., registered in the United States and other countries.
[xyz-ips snippet=”download-snippet”]