
Tribit BTH91 True Wireless Earbuds
Packing List
|
|
|
|
|
|
|
|
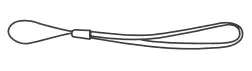 Wristlet
Product Illustration
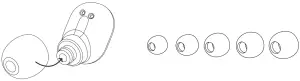
Replace the Ear Tips
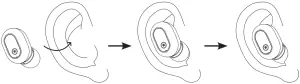
Wear the Earbuds
Power on / off
Power on:
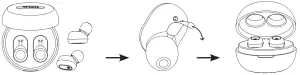
For the first time use, please, remove the insulated strips on the earbuds and then place the earbuds into the charging case. They will automatically turn on when you take them again out of the charging case.
Power off:
Place the earbuds back into the charging case.
Bluetooth Connection
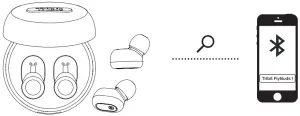
- Connect with Bluetooth DevicesWhen you take the earbuds out of the case, they’ll enter Bluetooth pairing mode automatically. Activate the Bluetooth function of your device and search for other Bluetooth-enabled devices. Click and connect to the “Tribit FlyBuds I ‘ on the searching list. The earbuds’ LED indicator will turn off when they are successfully connected.

- Please, refer to the following two ways when connecting with other devices:
- Disconnect the current device, then the earbuds will automatically enter Bluetooth pairing mode.
- Turn off the left and right earbuds, then press and hold the buttons of both earbuds until the LED indicator flashes red and blue lights alternately. Release the buttons and the earbuds will enter the Bluetooth pairing mode (the earbuds must be out of charging case).
 |
Play/ pause the music: Short press | 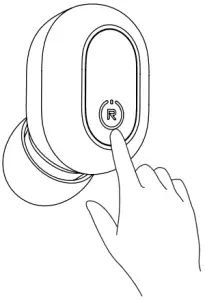 |
 |
Answer/ hang up the call: Short press | |
 |
Reject the incoming call: Press it twice | |
 |
Skip to the next song: Press it twice | |
 |
Press and hold it for 5s to turn off the device | |
 |
Press and hold It for 3s to turn on the device | |
 |
Activate the voice assistant function: Continuously press it 3 times |
LED Indicator on Earbuds
Power on: blue indicator flashes slowly and then turns offPower off: red indicator turns on and then quickly turns offIn pairing state: the indicator flashes red and blue alternatelySuccessful connection: the indicator turns offLow battery: red indicator flashes slowly
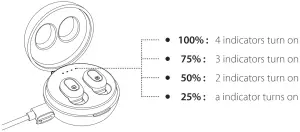
Battery Level Indication
Charging Instruction
- Place the earbuds back into the charging case to charge them.-Charging time: 70 minutes– In charging process: red indicator turns on sturdily– Being fully charged: red indicator turns off
- The charging case supports wireless charging. Please, place the case on a standard Qi-enabled wireless charger to charge the device.
- The charging case can be charged with charging cable too. Connect one end of the provided USB cable to SV power outlet and the other end into the charging interface.The charging case will vibrate when it is connected to the charging cable or placed on a wireless charger.-Charging time: 80 minutes– In charging process: battery indicators flashes– Being fully charged: 4 battery indicators turn on sturdily
Reset
- The earbuds cannot work normally.Please, put the earbuds back into the charging case. When the LED indicator glows in red, press and hold the button for 2 seconds until the indicator turns off and then turns on again, indicating the earbuds have reset successfully.
- The left and right earbuds are not paired successfully.Please, turn off the left and right earbuds, then press and hold the buttons on both earbuds until the LED indicator flashes red and blue alternately. Release and press the buttons twice to pair both earbuds (the earbuds must be out of charging case).
FCC Statement
Changes or modifications not expressly approved by the party responsible for compliance could void the user’s authority to operate the equipment.
This equipment has been tested and found to comply with the limits for a Class B digital device, pursuant to Part 15 of the FCC Rules. These limits are designed to provide reasonable protection against harmful interference in a residential installation. This equipment generates uses and can radiate radio frequency energy. If not installed and used in accordance with the instructions, it may cause harmful interference to radio communication. However, there is no guarantee that interference won’t occur in a particular installation. If this equipment does cause harmful interference to radio or television reception, which can be determined by turning the equipment off and on. Users are encouraged to try to correct the interference by one or more of the following measures:
– Reorient or relocate the receiving antenna.– Increase the separation between the equipment and receiver.– Connect the equipment into an outlet on a circuit that is different from that to which the receiver is connected.– Consult the dealer or an experienced radio/TV technician for help.
This device complies with part 15 of the FCC rules. Operation is subject to the following two conditions:
- This device may not cause harmful interference.
- This device must accept any interference received, including interference that may cause undesired operation.
 report this ad
[xyz-ips snippet=”download-snippet”]