ULINE S-7698 Insert Cards Instructions
INSTRUCTIONS
MICROSOFT WORD 2010 SETUP (PC USERS)
CREATING LABELS
- On the toolbar ribbon, click the MAILINGS tab. (See Figure 1) Figure 1
- Click the LABELS button. (See Figure 2) Figure 2
- On the LABELS tab, click the OPTIONS button. (See Figure 3) Figure 3
- Under LABEL INFORMATION, use the drop down menu to select MICROSOFT. (See Figure 4) Figure 4
CREATING LABELS CONTINUED
- Under PRODUCT NUMBER, select LETTER (PORTRAIT). (See Figure 5) Figure 5
- Click the NEW LABEL (See Figure 6) Figure 6
- Under PRODUCT NUMBER, select LETTER (PORTRAIT). (See Figure 5)
 Figure 1
 Figure 2
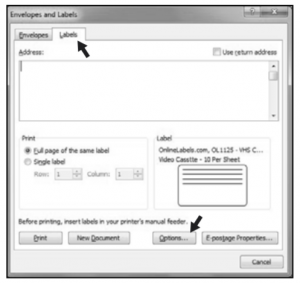 Figure 3
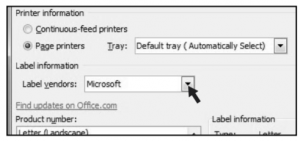 Figure 4
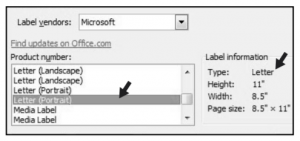 Figure 5
 Figure 6
SETTING MARGINS
- Enter the following settings:NOTE: Enter the value for Number Across first.
- In the LABEL NAME box, enter a name for your template (i.e. Uline item # S-12552). (See Figure 7)Figure 7
- Click the OK
- Click OK in the LABEL OPTIONS
- Click NEW DOCUMENT in the ENVELOPES & LABEFigure 8

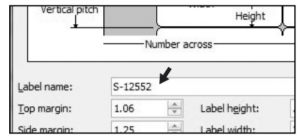 Figure 7
 Figure 8
TYPE
Format and add text as you desire.
- Place Insert Cards in the printer paper tray and select PRINT.NOTE: The perforated “T” on the label sheet denotes the top of the page.
 NOTE: The perforated “T” on the label sheet denotes the top of the page.
TO USE THIS TEMPLATE AT ANOTHER TIME
- On the toolbar ribbon, click the MAILINGS
- Click the LABELS
- On the LABELS tab, click the OPTIONS
- Under LABEL INFORMATION, use the drop down menu to select OTHER/CUSTOM. (See Figure 9) Figure 9
- In the PRODUCT NUMBER listing, select your saved template. (See Figure 9
- Click the OK
-
- Click NEW DOCUMENT in the ENVELOPES & LABELS menu.
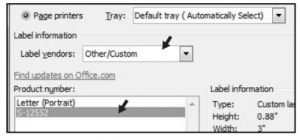 Figure 9
Read More About This Manual & Download PDF:
[xyz-ips snippet=”download-snippet”]