
 User Guide
PLEASE READ THIS DOCUMENT IN ITS ENTIRETY, INCLUDING “IMPORTANT SAFEGUARDS” AND “PREVENTING INADVERTENT UNLOCKING OF YOUR DOOR” ON PAGE 2.
1 Kevo at a Glance2 Kevo-Compatible Devices3 Quick Start4 Normal Operation5 Advanced Features6 All About eKeys7 System Reset8 Device Calibration9 Important Safeguards10 Need Help?
1 Kevo at a Glance
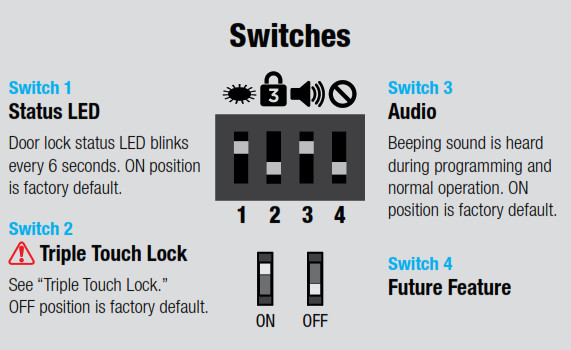
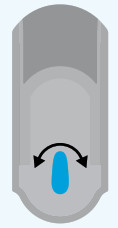
 1. Touch Kevo anywhere on the metallic surface behind the light ring to lock and unlock.2. Insert your SmartKey tool here when rekeying your lock to work with your existing key.3. Changes color to communicate with you.4. Insert your standard key here.5. Only use to reset Kevo to delete all eKeys and fobs. See “System Reset” for more information.6. Where all the programming features are located.7. Use to enroll phones and fobs.8. Use to manually lock and unlock Kevo from the inside. When the turn piece is vertical, Kevo is locked.When it is horizontal, Kevo is unlocked.9. Use to calibrate phones and fobs.10. Use to enable and disable the Status LED, Triple Touch Lock, and Audio.11. Communicates whether the door is locked or unlocked and flashes red for a low battery alert. Can be turned on and off by Switch #1.
2 Kevo-Compatible Devices
Kevo can be locked or unlocked with these devices:
Smartphones and Smart Devices
A Kevo-compatible smartphone (or other mobile internet-connected device or tablet) must have Bluetooth Smart Ready/ Bluetooth 4.0 and an app-specific to the device must be installed. Find out if your device is compatible at www.weiserlock.com/kevo/devices.

Kevo Fob
A Kevo Fob is a Bluetooth device that provides the same touch-to-open convenience as a smartphone. Additional fobs can be purchased as needed. Up to eight fobs can be enrolled in a single Kevo lock. A single fob can be enrolled in up to 25 different Kevo locks.

Standard Key
Always make sure you have access to your standard key. You can use the SmartKey tool to rekey your lock so it works with your existing Weiser key. See the supplied SmartKey rekey instructions for more information.

Note: You may choose to use only Kevo fobs, only smartphones, or a mix of both in your Kevo system.
3 Quick Start
A Install the Kevo Lock
 http://qrs.ly/ic3kf7d See the supplied Installation Guide for complete instructions or view the installation video at www.weiserlock.com/kevo/support.
Note: The door handing process, Steps 21 and 22 in the Installation Guide, is crucial for lock operation. To check if the door handing process was completed, rotate the turn piece on Kevo’s interior. If it doesn’t rotate smoothly, the door handing process was not performed correctly, and Steps 21 and 22 should be performed again.
B Wake Up Your Kevo Fob
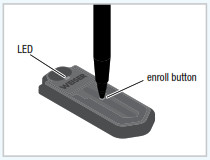
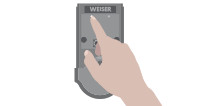
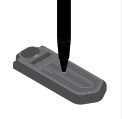
The fob that came with your Kevo lock is already enrolled in the lock. You must press and release the enroll button on the fob with a ballpoint pen to wake it up before you can start using it. When the fob’s LED flashes green, the fob is awake.
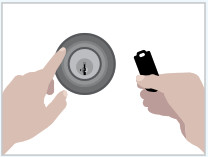
C Test Your Kevo Fob
Bring your fob and standard key outside with you and test to make sure that Kevo is communicating with your fob to lock and unlock. See “Normal Operation” for more information.
If your fob is unable to communicate with the lock, see the online Troubleshooting Guide at www.weiserlock.com/kevo/support.
D Calibrate Your Fob
The calibration process is required to enable Kevo’s inside-outside security functionality. After successfully completing calibration, your Kevo’s inside-outside sensor will be enabled for your fob.When enabled, the sensor can help prevent your door from being unlocked by unauthorized users while your fob is inside.
Note: The calibration process is a device-specific activity. Kevo’s inside-outside sensor will remain disabled for any uncalibrated fob.See “Device Calibration”.
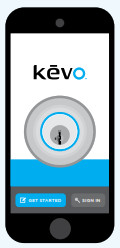
E Download the Kevo App
 http://qrs.ly/re3kf6aDownload the Kevo app at www.weiserlock.com/kevo/app
F Enroll Your First Smartphone
Follow the instructions inside the Kevo app to create an account and set up the lock to work with your phone. The phone used during the first-time setup will be assigned the only Owner eKey. See “All About eKeys” for more information.
Note: Your phone must have a data connection for the first-time setup.
G Calibrate Your Phone
The Kevo app will prompt you to calibrate your phone after it is enrolled. The calibration process is required to enable Kevo’s inside-outside security functionality. After successfully completing calibration, your Kevo’s inside-outside sensor will be enabled for your device. When enabled, the sensor can help prevent your door from being unlocked by unauthorized users while your device is inside.
Note: The calibration process is a device-specific activity. Kevo’s inside-outside sensor will remain disabled for any uncalibrated device.See “Device Calibration”.
H Test Your Smartphone
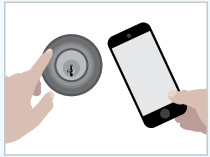
Bring your phone and standard key outside with you and test to make sure that Kevo is communicating with your phone to lock and unlock. See “Normal Operation” for more information.
I Send eKeys to Family & Friends
Follow the instructions inside the Kevo app to send eKeys to family and friends. Make sure your eKey recipients have Kevo-compatible smartphones. The eKey email notification will prompt the recipient to download the Kevo app and accept the eKey inside the app.
Note: It is highly recommended that all frequent users of your lock perform the calibration process to enable the inside-outside sensor for their devices.
See “Device Calibration”.
4 Normal Operation
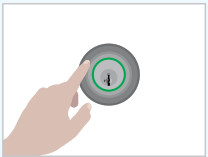
A A Unlocking the Door from the Outside
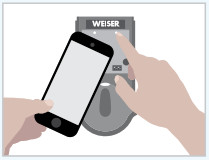
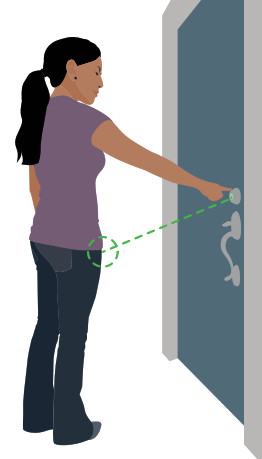
Touch the deadbolt rose while your phone or fob is with you. You may need to turn towards the lock so that there is a clear line of sight between the lock and your device. The light ring will spin blue, then flash green twice, and you will hear two beeps (if switch #3 is on). The door will unlock.
If you are using a smartphone, it may beep or vibrate.
B Locking the Door from the Outside
Touch the deadbolt rose while your phone or fob is with you. You may need to turn towards the lock so that there is a clear line of sight between the lock and your device. The light ring will spin blue, then flash amber once, and you will hear one beep (if switch #3 is on). The door will lock.
If you are using a smartphone, it may beep or vibrate.

Note: If the light ring turns blue, but shuts off without locking or unlocking your door, Kevo was unable to establish a connection with your device. Try touching deadbolt rose again. If this happens frequently, see the online Troubleshooting Guide.
C Triple Touch Lock
This is a convenient feature that allows you to lock the door from the outside without the use of a smartphone or fob.
You might use Triple Touch Lock if you are using only a standard key in your system but wish to lock the door by touch, if your smartphone or fob is disabled, or if you have a visitor in your home that will leave and lock the door behind them.
Note: This feature is OFF by default. To enable it, flip Switch #2 to the ON position, then lock or unlock the door by touching the deadbolt rose.
To lock the door with this feature, touch the deadbolt rose three times, pausing briefly between each touch. The light ring will spin blue, flash amber, and you will hear one beep (if switch #3 is on).
![]() CAUTION: With this feature enabled, it is possible to lock yourself outside if you don’t have an enrolled smartphone, Kevo fob, or standard key with you.
CAUTION: With this feature enabled, it is possible to lock yourself outside if you don’t have an enrolled smartphone, Kevo fob, or standard key with you.
D Error Notifications
A complete audio/visual chart of all the lights and sounds in the Kevo system is available in the online Troubleshooting Guide at www.weiserlock.com/kevo/support.

5 Advanced Features
A Inside-Outside Sensor
The Kevo lock features a sensor that can tell if your device is inside or outside your home. When enabled, it can help prevent your door from being unlocked by unauthorized users while your device is inside.
B Notifications
The Kevo app can send notifications when the door is locked and unlocked by eKey holders. You can choose to receive the system’s default notifications or set up custom notifications to monitor a specific user or time frame.
C History Log
A history of the lock’s activity may be viewed through the Kevo app or by logging into the web portal: www.mykevo.com.
D Kevo App Passcode
Kevo features an optional, added-security passcode that you can enable inside the app to be used in addition to the app’s password. Enabling the passcode will require you to enter a 4-digit PIN whenever you access the app, and it protects your Kevo account against unauthorized changes when your phone is unlocked.
6 All About eKeys
An eKey is an electronic key that can be sent to family and friends with Kevo-compatible smartphones. The first phone you enroll with the lock will automatically receive the only Owner Key, and an additional eKey will be added to your account so you can send it to a friend or family member. Additional eKeys can be purchased as needed through the app.
When you send eKeys to family and friends, you can choose which eKey type they receive.
Like an Owner eKey, Admin eKeys give the recipient the ability to purchase, send, disable and delete eKeys, view a lock’s history and receive notifications. Admin eKey holders can delete the Admins in the system, but they cannot delete the Owner.
Anytime eKey holders can lock and unlock your Kevo, but they cannot manage eKeys.
Disabling eKeys
You can disable an eKey from an individual user within the app or web portal (www.mykevo.com). Disabling an eKey will temporarily disallow access to the Kevo lock until you re-enable it.
Deleting eKeys
Deleting an eKey will permanently remove that eKey from your system.
7 System Reset
![]() WARNING: Resetting your Kevo system will restore your lock to factory default settings and delete all smartphones and fobs from Kevo’s memory.
WARNING: Resetting your Kevo system will restore your lock to factory default settings and delete all smartphones and fobs from Kevo’s memory.
If you wish to perform a system reset, press and hold the Reset button on the back panel for 10 seconds until the lock beeps and the light ring flashes red.
Phones: After a system reset, you will need to reenroll and calibrate your Owner phone. You will still be able to maintain all eKeys associated with your Kevo account and send eKeys at no charge to anyone who previously had an active eKey at the time of reset.
Fobs: After a system reset, all fobs will need to be re-enrolled and calibrated. Follow the instructions in “Enrolling a Fob” and “Fob Calibration.”
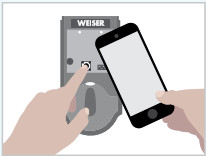
A Enrolling a Fob
Note: The fob that came with your lock is already enrolled, but it must be re-enrolled if the lock is reset.
1 Press and release the fob’s enroll button. The fob’s LED will begin to blink green.
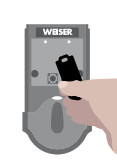
2 Press and release the Program button.

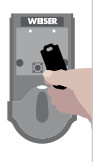
3 Hold the fob close against the back panel. The fob’s LED will begin to blink faster. When it turns solid green, the fob is successfully enrolled.
4 Bring your fob and standard key outside with you and test to make sure that Kevo is communicating with your fob to lock and unlock.
If the fob will be used frequently in your Kevo system, it is highly recommended that you perform the calibration process for added security.
8 Device Calibration
The calibration process is required to enable Kevo’s inside-outside security functionality. When enabled, the inside-outside sensor can help prevent your door from being unlocked by an unauthorized user while your device is inside. After successfully completing calibration, your Kevo’s inside-outside sensor will be enabled for your device, and your lock’s activation range will be optimized for your device and entryway. Activation range refers to the area around the lock-in in which it can detect your device and respond to touch.
Note: The calibration process is a device-specific activity. Kevo’s inside-outside sensor will remain disabled for an uncalibrated device.
Note: Each calibration environment is unique. As a result, multiple attempts may be required before a successful calibration is achieved.
Learn more about calibration at www.weiserlock.com/kevo/support.
 http://qrs.ly/wi3kf7n
A Where to Calibrate
When performing the calibration process, keep your device in the front pocket of your pants and remove all other contents from your pocket. For best results, stand at an extended arm’s reach from the lock and align your pocket to establish a clear line of sight between the lock and your device. If you have questions regarding where to calibrate, consult the online Troubleshooting Guide.
Note: You will not necessarily need to keep your device in the pocket in which it was calibrated during normal operation. See “After Successful Calibration.”
B Fob Calibration
1 Remove battery cover.
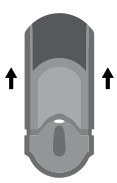
2 Press and release the Calibrate button.

3 old fob close against the back panel until the fob’s LED begins to flash amber.
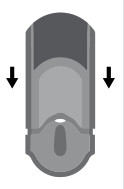
4 Replace the battery cover.
5 Go outside with your fob and standard key and close the door.
6 Place your fob in the empty front pocket of your pants (on the side that has the clearest line of sight to the lock).
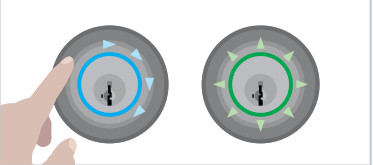
7 When the light ring becomes solid green, touch the deadbolt rose. The light ring will spin green. Wait for it to stop spinning, then touch the deadbolt rose again. Repeat the touch sequence one more time

8 After the third touch, the light ring will flash green if calibration is successful or red if calibration is unsuccessful.

C Smartphone Calibration
Inside the Kevo app, navigate to your lock’s settings and tap “Calibrate.” Follow the prompts within the app.
D Unsuccessful Calibration
If calibration is initially unsuccessful, attempt calibration again and adjust the orientation and proximity of your device. If it continues to be unsuccessful after multiple attempts, see the online Troubleshooting Guide, or contact the Kevo Support team for assistance. If needed, you may temporarily disable Kevo’s Touch-to-Open functionality until successful calibration is chieved. See “Temporarily Disabling Touch-to-Open Functionality.”
E After Successful Calibration
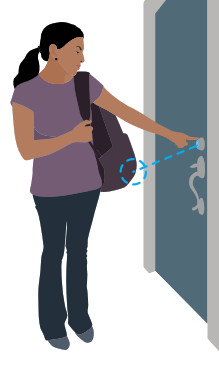
Once your device has been successfully calibrated, you do not necessarily need to keep your device in the pocket in which it was calibrated. During normal operation, you may hold it in your hand, put it in another pocket, or keep it in a purse or backpack. Pocket: For best results during normal operation, turn toward the lock so that there is a clear line of sight between the lock and your device. Purse and backpack: For best results during normal operation, store your device in the outermost pocket of your purse or backpack, and turn it towards the lock so that there is a clear line of sight between the lock and your device.
F Temporarily Disabling Touch-to-Open Functionality
Kevo provides multiple options to disable communication between the Kevo lock and your devices until successful calibration is achieved:
- Utilize the built-in motion detection in the Kevo app and fob (when the devices are not in motion for 30 seconds or longer, they will no longer communicate with the lock).
- Sign out of the Kevo app.
- Put your fob in sleep mode by pressing and holding the fob’s enroll button for 10 seconds until it flashes red. To wake up the fob, press and release the fob’s enroll button.When the fob’s LED flashes green, the fob is awake.
- Remove the battery pack from Kevo’s interior and use your standard key.
9 Important Safeguards
-
- Read all instructions in their entirety.
- Familiarize yourself with all warning and caution statements.
- Remind all family members of safety precautions.
- Always have access to your lock’s standard key.
- If using the Triple Touch Lock feature, make sure to have your smartphone, fob or standard key with you to prevent locking yourself out.
- Familiarize yourself with all light ring error notifications.
- Replace low batteries immediately.
A Preventing Inadvertent Unlocking of Your Door
![]() WARNING: Failure to follow these safeguards could result in your lock opening inadvertently.
WARNING: Failure to follow these safeguards could result in your lock opening inadvertently.
-
- Calibrate all devices in your Kevo system.
- Avoid keeping and storing calibrated phones and fobs unnecessarily close to the lock when inside the home.
- If you are unable to calibrate your device, temporarily disable Kevo’s Touch-to-Open functionality.
- Restrict access to your Kevo lock’s back panel and routinely check your settings to ensure they have not been altered without your knowledge.
- Protect the password to your Kevo app and web portal accounts.
- When sending an eKey, always double-check that you are sending it to the correct recipient.
- Protect and restrict access to your smartphone so that your app settings cannot be altered without your knowledge.
- Enable the Kevo app’s security passcode so that your app settings cannot be altered without your knowledge.
- When sending eKeys, be aware of the difference between an Admin user and other users in the system: an Admin user can send, disable and delete eKeys.
- If your smartphone is lost or stolen, use the Kevo web portal (www.mykevo.com) to disable it.
- If a fob in your Kevo system is lost or stolen, reset your lock to delete it from memory.
![]() CAUTION: The calibration process, which enables the lock’s inside-outsidesensor, is an important security measure; however, as with any radio-based technology, it should be noted that the accuracy and reliability of the Kevo lock’s inside-outside sensor cannot be guaranteed. Users should not rely solely on the Kevo lock’s sensor for security purposes and should always use caution. Weiser assumes no responsibility for incorrect results or damages resulting from the use of the Kevo lock’s sensor.
CAUTION: The calibration process, which enables the lock’s inside-outsidesensor, is an important security measure; however, as with any radio-based technology, it should be noted that the accuracy and reliability of the Kevo lock’s inside-outside sensor cannot be guaranteed. Users should not rely solely on the Kevo lock’s sensor for security purposes and should always use caution. Weiser assumes no responsibility for incorrect results or damages resulting from the use of the Kevo lock’s sensor.
Certain home configurations may impede the Kevo lock’s sensor more than others. Example: Your home office is located next to your entryway, and part of the office extends past the front door, jutting into the front yard. If your device is being actively used in that office extension, the Kevo lock’s sensor could possibly detect the device as being outside of your home while that device is in active use.
![]() CAUTION: Prevent unauthorized entry. Because anyone with access to the back panel can change your Kevo lock’s settings, you must restrict access to the back panel and routinely check your settings to ensure they have not been altered without your knowledge.
CAUTION: Prevent unauthorized entry. Because anyone with access to the back panel can change your Kevo lock’s settings, you must restrict access to the back panel and routinely check your settings to ensure they have not been altered without your knowledge.
![]() WARNING: This Manufacturer advises that no lock can provide complete security by itself. This lock may be defeated by forcible or technical means, or evaded by entry elsewhere on the property. No lock can substitute for caution, awareness of your environment, and common sense. Builder’s hardware is available in multiple performance grades to suit the application. In order to enhance security and reduce risk, you should consult a qualified locksmith or other security professional.
WARNING: This Manufacturer advises that no lock can provide complete security by itself. This lock may be defeated by forcible or technical means, or evaded by entry elsewhere on the property. No lock can substitute for caution, awareness of your environment, and common sense. Builder’s hardware is available in multiple performance grades to suit the application. In order to enhance security and reduce risk, you should consult a qualified locksmith or other security professional.
B Regulatory Compliance
This product complies with standards established by the following regulatory bodies:
- Federal Communications Commission (FCC)
- Industry Canada
FCC
This device complies with Part 15 of the FCC Rules. Operation is subject to the following two conditions:
( 1 ) this device may not cause harmful interference, and( 2 ) this device must accept any interference received, including interference that may cause undesired operation.
This equipment has been tested and found to comply with the limits for a Class B digital device, pursuant to Part 15 of the FCC Rules. These limits are designed to provide reasonable protection against harmful interference in a residential installation. This equipment generates, uses, and can radiate radio frequency energy and, if not installed and used in accordance with the instructions, may cause harmful interference to radio communications. However, there is no guarantee that interference will not occur in a particular installation. If this equipment does cause harmful interference to radio or television reception, which can be determined by turning the equipment off and on, the user is encouraged to try to correct the interference by one or more of the following measures:
- Reorient or relocate the receiving antenna.
- Increase the separation between the equipment and receiver.
- Connect the equipment into an outlet on a circuit different from that to which the receiver is connected.
- Consult the dealer or an experienced radio/TV technician for help.
IMPORTANT! Changes or modifications not expressly approved by the manufacturer could void the user’s authority to operate the equipment.
Industry Canada
This Class B digital apparatus complies with Canada ICES-003. CAN/CSA-C22.2 NO. 14-05 (Industrial Control Equipment) Operation is subject to the following two conditions: ( 1 ) this device may not cause interference, and ( 2 ) this device must accept any interference, including interference that may cause undesired operation of the device.
10 Need Help?
Online Support
You can utilize the help feature inside the Kevo app, and you can find a complete Troubleshooting Guide and FAQ List online at www.weiserlock.com/kevo/support.
Contact a Kevo Support Specialist
If you have questions, our highly trained Kevo Support team can provide you with the assistance you need:
Weiser Kevo Support1-800-677-5625www.weiserlock.com6:30am – 4:30pm PST Mon-Friday6:30am – 4:00pm PST Saturday Closed Sunday
Kevo Smart Locks User Manual – Kevo Smart Locks User Manual –