
ZYXEL Rugged Switch RGS100-5P User Guide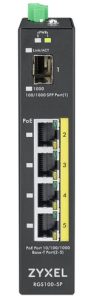
Overview
The RGS100-5P Rugged switch is designed for supporting environmental hardening application without complex setup to make the network truly plug-and-play.
Ground Connecting
The switch must be properly grounded for optimum system performance.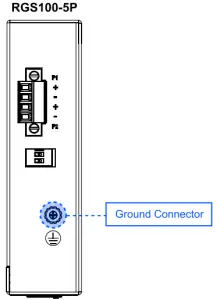
Power Connecting
The switch can be powered from two power supply (input range 12V -58V), Insert the positive and negative wires into V+ and V- contact on the terminal block and tighten the wire-clamp screws to prevent the wires from being loosened,![]() The DC power should be connected to a well-fused power supply.
The DC power should be connected to a well-fused power supply. ![]() Input power should be within the range of 54 58 VDC for PoE+ compliant. or 48-58VDC for PoE compliant.
Input power should be within the range of 54 58 VDC for PoE+ compliant. or 48-58VDC for PoE compliant.
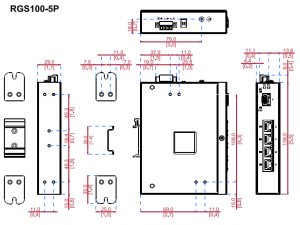
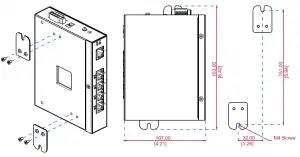
Dimension Illustration
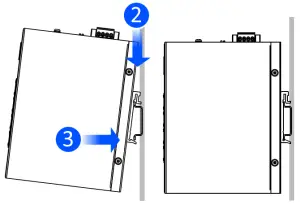
E. DIN-Rail Mounting
Mounting step:
- Screw the DIN-Rail bracket on with the bracket and screws in the accessory kit.
- Hook the unit over the DIN rail.
- Push the bottom of the unit towards the DIN Rail until it snaps into place.
![]() This equipment is intended to be used in a Restricted Access Location, with access limited to SERVICE PERSONAL and USERS authorized to be in that location.
This equipment is intended to be used in a Restricted Access Location, with access limited to SERVICE PERSONAL and USERS authorized to be in that location.
Wall Mounting
Screw on the wall-mount plate on with the plate and M4 screws in the accessory kit.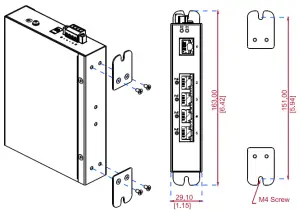
A. The RGS100-5P Rugged switch is designed for supporting environmental hardening application without complex setup to make the network truly plug-and-play.
B. The switch must be properly grounded for optimum system performance.
C. The switch can be powered from two power supply (input range 12V — 58V). Insert the positive and negative wires into V+ and V- contact on the terminal block and tighten the wire-clamp screws to prevent the wires from being loosened.
- The DC power should be connected to a well-fused power supply.
- Input power should be within the range of 54-58 VDC for PoE+ compliant, or 48-58VDC for PoE compliant.
E. Mounting step:
- Screw the DIN Rail bracket on with the bracket and screws in the accessory kit.
- Hook the unit over the DIN rail.
- Push the bottom of the unit towards the DIN Rail until it snaps into place.
F. Screw on the wall-mount plate on with the plate and M4 screws in the accessory kit.
Support Information
USA![]() +1 800 255 4101
+1 800 255 4101![]() [email protected]
[email protected]
EU Importer ZyXEL Communication A/SGeneratorvej 8D, 2860 Seborg, Denmark. https://www.zyxel.com/dk/da/EU![]() https://support.zyxel.euUS Importer ZyXEL Communications, Inc1130 North Miller Street Anaheim, CA 92806-2001 https://www.zyxel.com/us/en/
https://support.zyxel.euUS Importer ZyXEL Communications, Inc1130 North Miller Street Anaheim, CA 92806-2001 https://www.zyxel.com/us/en/

[xyz-ips snippet=”download-snippet”]